Concurrent Program creation
What is Concurrent Program?
Any Program that can be separately constructed to be non-interactive could potentially be run as a standalone program in concurrent process. The process of creating a concurrent program is the same regardless of the execution method.
Any Program that can be separately constructed to be non-interactive could potentially be run as a standalone program in concurrent process. The process of creating a concurrent program is the same regardless of the execution method.
Creation of Concurrent Program: Executable & Definition
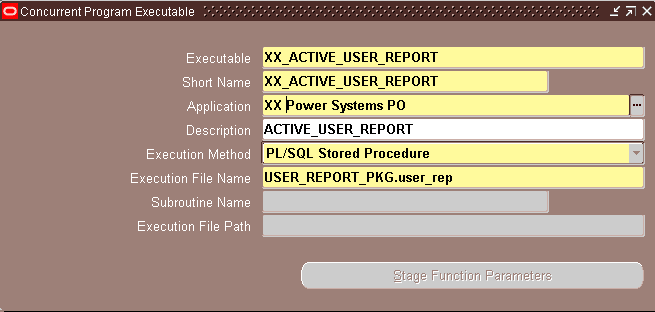
Step 1: Executable creation
Sysadmin Responsibility-> Concurrent -> Program->Executable
Short Name:
In the concurrent programs form, assign this name to a concurrent program to associate the concurrent program with the executable logic.
Short Name:
In the concurrent programs form, assign this name to a concurrent program to associate the concurrent program with the executable logic.
Application: The concurrent managers use the application to determine in which directory structure to look for your execution file.
Type of Execution Methods available:
A SQL script
A SQL*Loader program
Java program
Oracle Report
Pl/SQL program (or call it a stored procedure/package procedure)
Host script, like a Unix shell script
Pro*C/Spawned
Perl
A SQL*Loader program
Java program
Oracle Report
Pl/SQL program (or call it a stored procedure/package procedure)
Host script, like a Unix shell script
Pro*C/Spawned
Perl
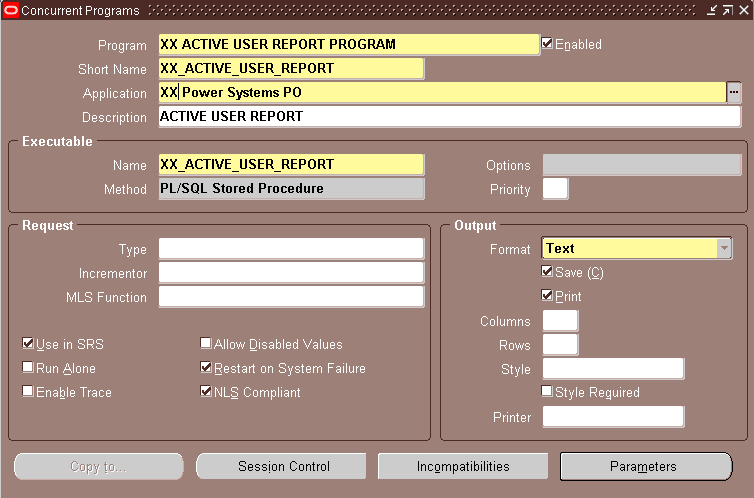
Step 2: Concurrent Program Definition
Sysadmin Responsibility-> Concurrent ->Program->Define
Assign Parameters as required by the executable script developed.
Step 3: Attach the program to the Request Group of the Responsibility from which the program is required to run.
Step 3: Attach the program to the Request Group of the Responsibility from which the program is required to run.
Sysadmin Responsibility-> Security-> Responsibility->Request
To find the Request Group go to Responsibility Definition form
Sysadmin Responsibility-> Security-> Responsibility->Define
Note: To Save click SAVE button (yellow floppy) icon shown below after every step
Comments
Post a Comment